🗳️ Setup Your Own Telegram Voting Bot
Learn how to set up your own Telegram bot to participate in Polkadot governance voting. Your governance proxy account's private key never leaves your machine, ensuring maximum security.
How it Works
The bot operates using the secure governance proxy account:
- You create a governance proxy account that has control over your main wallet's voting power
- You run a Telegram bot locally on your computer that only you control
- The bot uses the proxy account's mnemonic to sign transactions
- When you vote through Telegram, the bot creates and signs the transaction using your proxy account
- Your main account's voting power is used, but the governance proxy account's private key never leaves your device
- The bot is secured with your Telegram user ID, ensuring only you can interact with it
🔒 Security Note
The governance proxy account you create can only vote on your behalf. It cannot transfer or move your funds, ensuring your assets remain secure even if the proxy account is compromised.
▶️ Prerequisites
- A Telegram account
- Node.js (v16 or higher) installed on your system
- A Polkadot account with voting power
- 20 DOT in your main account to lock for the governance proxy account
- Basic understanding of command line operations
1. Download the Bot Code
Get the bot code on your computer:
- Click this link to download the bot: Download Bot
- Once downloaded, find the zip file in your Downloads folder
- Double-click the zip file to extract it
- Open the extracted folder named "opentgov-main"
- Inside that folder, you'll find a folder named "bot" - that's what we need
2. Install Dependencies
Now we need to install the required software:
- Open Terminal (on Mac) or Command Prompt (on Windows)
- Type
cdfollowed by a space - Drag and drop the "bot" folder into the terminal window
- Press Enter
- Type
npm installand press Enter - Wait for the installation to complete
3. Create Your Telegram Bot
- Open Telegram and search for @BotFather
- Send the
/newbotcommand - Follow the instructions to create your bot
- Save the API token you receive, we will need it later to configure the .env file
4. Get Your Telegram User ID
- Open Telegram and search for @UserInfoBot
- Click "Start" or send
/startto the bot - The bot will reply with your user information, including your user ID
- Copy the number shown as "Id:" - this is your Telegram user ID
- Save your Telegram ID, we will need it later to configure the .env file
5. Set Up Your Polkadot Governance Proxy Account
💡 In order to create a governance proxy account, you need to lock 20 DOT. You can get them back when you remove the proxy.
- Create a new account on Polkadot.js Apps
- Save the mnemonic phrase securely, we will need it later to configure the .env file
- Fund this account with at least 1 DOT in order to pay for the proxy transaction
- Link your new account as a governance proxy to your main account (the one holding your voting power):
- Go to Accounts > Proxies
- Select your main account
- Click on the three dots, select "Add proxy", select your new account
- Choose "Governance" as proxy type
- Submit and sign the transaction
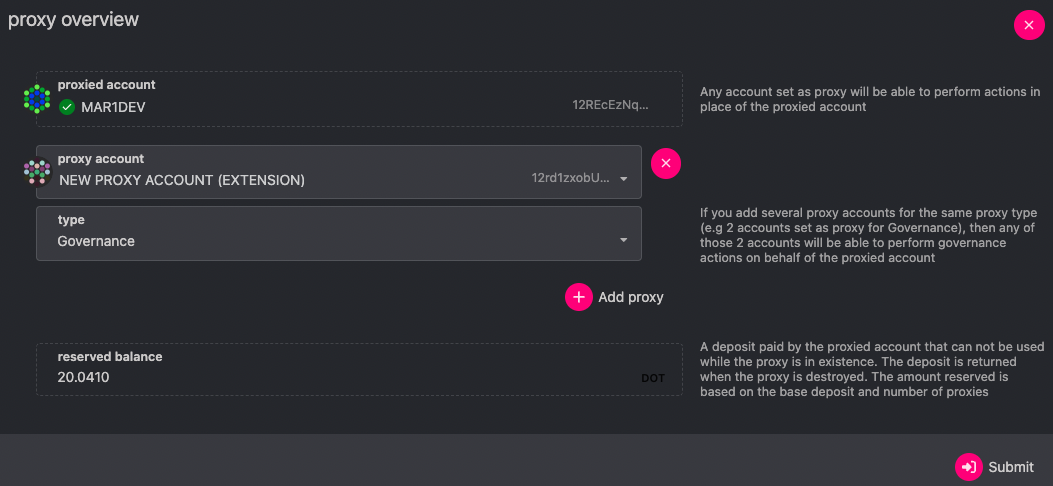
Screenshot showing the proxy creation process in Polkadot.js Apps
6. Configure Your Bot
Create a .env file in the bot directory with the following variables:
💡 The .env file is a simple text file. You can create it using any text editor (like Notepad, TextEdit, or VS Code). Just create a new file, save it as .env (including the dot), and copy and fill in the content below into it.
BOT_TOKEN=your_telegram_bot_token // cf step 3
AUTHORIZED_USER_ID=your_telegram_user_id // cf step 4
POLKADOT_PROXY_MNEMONIC=your_governance_proxy_mnemonic_phrase // cf step 5
POLKADOT_RPC=wss://rpc.polkadot.io  # Optional, defaults to this
⚠️ IMPORTANT:
- Set AUTHORIZED_USER_ID to your Telegram user ID to ensure only you can use the bot. You can get your user ID by messaging @UserInfoBot on Telegram.
- Set POLKADOT_MNEMONIC to the mnemonic phrase of your governance proxy account (the new account you just created), NOT your main account's mnemonic. The bot needs to sign transactions with the proxy account's key.
7. Start the Bot
npm start
If you see a message like this in your terminal, congrats, your bot is running successfully:
✅ Self-custodial OpenGov voting bot is running...
📱 To start using the bot, open Telegram and send /start to @your_bot_name
The bot will display its actual username instead of @your_bot_name. You can now open Telegram and start interacting with your bot!
8. Open a Chat with Your Bot
- Open Telegram
- Search for your bot's username
- Click on your bot to open a chat
- Send the
/startcommand to initialize the bot - You should receive a welcome message confirming the bot is working
💡 If you don't see your bot in the search results, make sure you've started it correctly in the terminal and that you're using the correct username.
Available Commands
/start- Initialize the bot/help- Show help message/vote <proposal_id> <aye/nay> <balance> [conviction]- Vote on a referendum/history- View voting history/balance- Check your balance
Changelog
Initial Beta Release
- Self-custodial Telegram bot for OpenGov voting
- Secure proxy-based voting system
- User authentication via Telegram ID
- Local voting history storage
- Support for conviction voting
Need Help?
Join our community for support and updates: